Overview
What This Guide Covers
Prerequisites & Requirements
Hardware Requirements
| Component | Minimum | Recommended | Enterprise |
|---|---|---|---|
| Processor | 2.4 GHz Quad-Core | 3.0 GHz 8-Core | Dual 3.2 GHz 16-Core |
| RAM | 8 GB | 32 GB | 64-128 GB |
| Storage | 250 GB SSD | 500 GB NVMe SSD | 1 TB NVMe RAID 10 |
| Network | 1 Gbps | 1 Gbps | 10 Gbps |
| Users | 5-10 | 10-30 | 30-40 |
Software Requirements
Server Operating System
QuickBooks® Versions
Critical Requirement
QuickBooks® Desktop must be installed on the server before proceeding with multi-user configuration. The Database Server Manager is included with QuickBooks® installation but requires separate configuration.
Network Architecture
Proper network architecture is critical for QuickBooks® multi-user performance. This section details the optimal network configuration for various deployment scenarios.
Network Topology Options
Option 1: Traditional Client-Server
Best for small to medium businesses with 5-30 users on a local network.
Recommended for:
Single office locations with reliable local network
Option 2: Remote Desktop Services (RDS)
Ideal for distributed teams, remote workers, or multi-location businesses.
Recommended for:
Multi-location businesses and remote teams that require centralized Windows sessions
Option 3: Hybrid Configuration
Combines local and remote access for maximum flexibility.
Recommended for:
Businesses with both office and remote workers
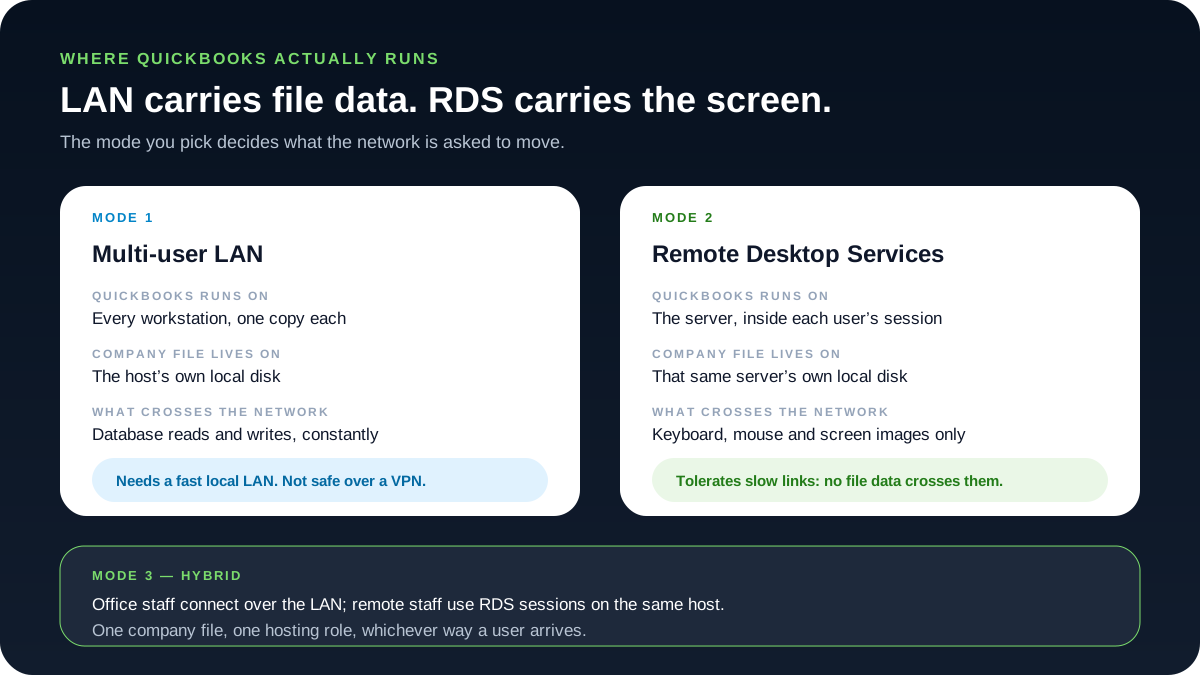
Where QuickBooks® runs, and what the network carries
The three topologies above differ in exactly one variable, and every other difference follows from it: where the QuickBooks® program itself executes. Once you know that, you know what has to travel between the machines, and therefore how fast and how reliable the link between them has to be.
Multi-user LAN. QuickBooks® runs on every workstation, one copy on each machine. The company file lives on the host's own local disk. What crosses the network is database reads and writes, constantly, for as long as anyone has the file open: each workstation's copy of QuickBooks® is in continuous conversation with the database service on the host. That traffic is why this arrangement needs a fast local network, and why it is not safe over a VPN or any other wide-area link.
Remote Desktop Services. QuickBooks® runs on the server, inside each user's own session. The company file lives on that same server's own local disk, so the reads and writes never leave the machine. What crosses the network is keyboard input, mouse movement and screen images only. That is why RDS tolerates slow or remote links in a way the LAN arrangement never can: no file data crosses them. A poor connection makes the screen feel sluggish; it does not put the company file in the middle of the problem.
Hybrid. Office staff connect over the LAN while remote staff open RDS sessions on the same host. Nothing about the hosting arrangement changes: there is still one company file and still one machine holding the hosting role, whichever way a given user arrives at it.
Windows Server Configuration
Pro Tip
Always create a system restore point before making server configuration changes. This allows quick rollback if issues occur.
Step 1: Initial Server Preparation
# Update Windows Server
Install-WindowsUpdate -AcceptAll -AutoReboot

# Install required features
Install-WindowsFeature -Name NET-Framework-Core
Install-WindowsFeature -Name NET-Framework-45-Features
Install-WindowsFeature -Name RDS-RD-Server
Install-WindowsFeature -Name RDS-Licensing
Install-WindowsFeature -Name RSAT-AD-Tools

# Configure Windows Firewall for QuickBooks®
New-NetFirewallRule -DisplayName "QuickBooks® Database Server" -Direction Inbound -Protocol TCP -LocalPort 8019,56726,55368-55375 -Action Allow
New-NetFirewallRule -DisplayName "QuickBooks® Database Server UDP" -Direction Inbound -Protocol UDP -LocalPort 8019,56726,55368-55375 -Action Allow

# Set static IP address (modify as needed)
New-NetIPAddress -InterfaceAlias "Ethernet" -IPAddress 192.168.1.10 -PrefixLength 24 -DefaultGateway 192.168.1.1
Set-DnsClientServerAddress -InterfaceAlias "Ethernet" -ServerAddresses 8.8.8.8,8.8.4.4
Step 2: Security Configuration
- 1Create QuickBooks® Service Account
Create a dedicated service account for QuickBooks® Database Server Manager with appropriate permissions.
- 2Configure User Groups
Create security groups for QuickBooks® users with different permission levels (Admin, Full Access, Limited Access).
- 3Set NTFS Permissions
Configure proper NTFS permissions on QuickBooks® program and data directories.
# Create QuickBooks® folders
New-Item -Path "C:\QuickBooks®" -ItemType Directory
New-Item -Path "C:\QuickBooks®\Company Files" -ItemType Directory

# Set permissions for QuickBooks® folders
$acl = Get-Acl "C:\QuickBooks®\Company Files"
$permission = "QBDataServiceUserXX","FullControl","Allow"
$accessRule = New-Object System.Security.AccessControl.FileSystemAccessRule $permission
$acl.SetAccessRule($accessRule)
Set-Acl "C:\QuickBooks®\Company Files" $acl
QuickBooks® Installation
Installation Process
Step 1: Download QuickBooks®
Download the latest QuickBooks® Desktop installer from Intuit's website using your license information.
Download URL: https://downloads.quickbooks.com/app/qbdt/products
Step 2: Run Installation
- 1. Run QuickBooksDesktop.exe as Administrator
- 2. Select "Custom and Network Options"
- 3. Choose "I'll be using QuickBooks® Desktop on this computer, AND I'll be storing our company file here so it can be shared over our network"
- 4. Enter license and product numbers
- 5. Select installation location (default: C:\\Program Files\\Intuit\\QuickBooks® 2024)
Step 3: Post-Installation Configuration
Database Server Manager Setup
Critical Step
Database Server Manager must be properly configured for multi-user access to work. Incorrect host, service, path, permission, or firewall configuration is a common cause of H202 and H505 errors.
Configuration Steps
- 1
Launch Database Server Manager
Start → All Programs → QuickBooks® → QuickBooks® Database Server Manager
If not installed, download from: Tools → QuickBooks® Database Server Manager
- 2
Add Folders to Scan
Click "Scan Folders" tab and add all folders containing QuickBooks® company files
• C:\\QuickBooks®\\Company Files• C:\\Users\\Public\\Documents\\Intuit\\QuickBooks®\\Company Files• Any network shares containing company files - 3
Start Scan
Click "Start Scan" to scan all folders for company files
Note: The scan creates .ND (Network Data) files for each company file. These are essential for multi-user access.
Verify Database Server Status
# Check if QuickBooks® services are running
sc query QuickBooksDB24
sc query QBCFMonitorService

# Start services if stopped
net start QuickBooksDB24
net start QBCFMonitorService

# Set services to automatic startup
sc config QuickBooksDB24 start=auto
sc config QBCFMonitorService start=auto
Multi-User Configuration
Multi-user access rests on one rule: for any given company file, exactly one machine may hold the hosting role. That machine runs the database service, claims the file and serves it to everyone else. Every other machine that opens the file must have hosting switched off. Two machines both believing they host the same file is the single a common origin of the H-series errors covered later in this guide.
Read the menu label backwards
Under File → Utilities, QuickBooks® names the action you can take, not the state you are in. So "Stop Hosting Multi-User Access" means hosting is currently ON — which is correct only on the host. And "Host Multi-User Access" means hosting is currently OFF — which is correct on every workstation. This is the most misread fact in multi-user setup, and misreading it leads people to switch hosting on everywhere, which is precisely the fault they were trying to fix.
Configuration Steps
- 1Switch hosting on at the host
On the machine that will serve the file, open QuickBooks® and go to File → Utilities. If the menu offers "Host Multi-User Access", hosting is off — click it. When it succeeds, that same menu entry will read "Stop Hosting Multi-User Access", which is how you know hosting is now on. If it already read that, leave it alone.
- 2Switch hosting off everywhere else
Visit every workstation and open the same File → Utilities menu. It should read "Host Multi-User Access" and you should leave it untouched. If a workstation reads "Stop Hosting Multi-User Access", that workstation is hosting and is competing with the real host — click it to stop, then move to the next machine.
- 3Create the QuickBooks® company users
Go to Company → Set Up Users and Passwords → Set Up Users and add one QuickBooks® user per person who will be in the file at the same time. These logins belong to the company file and are separate from the Windows accounts people sign into the server or their workstation with.
- 4Open the file once on the host in multi-user mode
Still on the host, open the company file and choose File → Switch to Multi-user Mode. This first open is what gets the database service to claim the file and write its network descriptor, so do it before any workstation tries to connect.
- 5Connect a workstation by UNC path, not a mapped drive
On a workstation choose File → Open or Restore Company and type the full UNC path, for example
\\SERVERNAME\QBData\Company.qbw. Avoid a mapped drive letter: a mapped drive can silently disconnect and reconnect, and QuickBooks® experiences that as the file vanishing mid-session. A UNC path is resolved fresh on each access and has no drive mapping to lose.
Verify Before Moving On
Three things should be true before you let anyone else into the file:
sc query command shown above..ND descriptor file sits beside the .QBW in the same folder — a file named Company.qbw.nd next to Company.qbw. No descriptor means no workstation will find the host.Remote Desktop Services Setup
When users arrive through Remote Desktop Services, one thing changes and it changes everything downstream: QuickBooks® no longer executes on the user's own machine. It executes on the session host, inside each user's session, and the user's device is doing nothing but drawing the picture. That means the server carries the whole workload of every concurrent user, and it means the questions that dominate a LAN deployment — network speed, file locking across the wire — largely stop applying, while licensing and profile questions take their place.
Deployment Steps
- 1Check the edition and the seat count first
Because QuickBooks® runs inside each session, every session that has the company file open consumes one licensed user, exactly as a separate workstation would. The installation therefore has to be a multi-user-capable edition with at least as many seats as you expect concurrent sessions. Getting this wrong is not a technical fault you can troubleshoot — users simply cannot get in.
- 2Install QuickBooks® on the session host
Install onto the Remote Desktop Session Host itself, not onto a separate machine that sessions reach across the network. Run the installer as administrator: Desktop installations on a Remote Desktop Session Host should be made with the installer run as administrator so that the per-machine components and services register correctly for every session rather than only for the account that ran setup.
- 3Sort out the Microsoft licensing separately
RDS Per-User or Per-Device client access licences are a Microsoft requirement and are entirely separate from the QuickBooks® licence — owning enough QuickBooks® seats does not cover them. An RD Licensing server has to be installed, activated and pointed at from the session host, and the licences installed on it. If that is not in place, sessions stop being accepted once the grace period expires, typically weeks after a deployment that seemed finished. Microsoft's Remote Desktop Services documentation at https://docs.microsoft.com/en-us/windows-server/remote/remote-desktop-services/ covers the licensing role setup.
- 4Decide how user profiles are handled
Each session gets its own Windows profile, and QuickBooks® keeps a great deal in it: form templates, memorised report settings, printer choices, window layout. Decide up front whether profiles stay local to the session host or roam — if they roam, size them, because QuickBooks® profile data grows. A user who reports that "all my customisations are gone" has usually landed on a different profile, not a different install.
- 5Restrict printer redirection to what people actually print to
Redirected client printers appear inside the session, and QuickBooks® enumerates the available printers when it builds a print or preview dialog. A session carrying dozens of redirected printers makes those dialogs slow for everyone, which reads as "QuickBooks® is slow" rather than as a printing problem. Redirect only the printers people use, or publish server-side printers instead.
- 6Keep company files on the session host's own local disk
Store the company files on a local volume of the session host, not on a second file server that the host reaches over the network. With QuickBooks® and the file on the same machine, no file data crosses the session link at all — only screen, keyboard and mouse do. Putting the file on another server reintroduces exactly the network-sensitive traffic that RDS was chosen to avoid.
H-series errors between sessions are not a network problem
When QuickBooks® and the company file both live on the session host, two sessions hitting each other are two processes on one machine — there is no wire between them to be at fault. So an H202 or H505 raised between RDS sessions is telling you something local: hosting mode set wrongly for a session, the database service not running, or NTFS permissions on the company folder. Checking cables, switches and firewall rules for that symptom will find nothing, because there is nothing there to find.
Firewall & Port Configuration
Firewall work for QuickBooks® goes wrong for one reason far more often than any other: people write the rule before they find out which port they actually need. Start by reading the port, then write rules against what you read.
Read the port before you write the rule
QuickBooks® 2019 and later assign the database service's port dynamically, so the number differs between installations and between year versions. Open Database Server Manager → Port Monitor on the host and read the port for your year version. A rule copied from an older guide is still present and still enabled — it just silently stops matching anything, which is why "the firewall rule is already there" is not evidence that the port is open.
Configuration Steps
- 1Read the listening port from Port Monitor
On the host, open QuickBooks® Database Server Manager and select the Port Monitor tab. Note the port shown against your year version and write it down — every rule below refers to that number rather than to a figure printed in a guide.
- 2Create inbound rules on the host for that port and for 8019
Two inbound TCP rules are needed: one for the port Port Monitor reported, which is the year's database service, and one for port 8019, which belongs to
QBCFMonitorServiceand is the same on every installation. - 3Put the rules on the host, not on the workstations
Workstations initiate the connection, so their traffic leaves outbound and the host's replies come back as part of a connection Windows already considers established. Nothing needs to be opened inbound on a workstation. Adding rules there is harmless but pure noise, and it distracts the next person who troubleshoots this.
- 4Add program exceptions as well as port rules
Allow
QBDBMgrN.exe,QBCFMonitorService.exeandQBW32.exeby program path. Program rules keep working when a service comes back on a different dynamic port, which port rules alone do not. - 5Treat the RDS session port as a separate concern
For RDS, TCP 3389 — or whatever port the deployment has been configured to use — carries the session itself. It has nothing to do with the database ports above, and opening one does not help the other. See the security section for how that port should and should not be reachable.
- 6Re-check the rules after a Windows feature update
Feature updates can reset or re-profile firewall rules, which is a common reason a deployment that worked for months fails overnight with nothing having been changed by anyone. Re-reading Port Monitor and confirming the rules is a two-minute check and should be the first thing you do after such an update.
# Replace 55378 with the port that Database Server Manager's Port Monitor tab
# reports for YOUR year version. QuickBooks® 2019 and later assign this port
# dynamically, so it differs between installations - do not assume this value.
$qbDatabasePort = 55378

# Inbound rule for the year's database service
New-NetFirewallRule -DisplayName "QuickBooks® Database Service" -Direction Inbound -Protocol TCP -LocalPort $qbDatabasePort -Action Allow

# Inbound rule for QBCFMonitorService, which uses 8019 on every installation
New-NetFirewallRule -DisplayName "QuickBooks® QBCFMonitorService" -Direction Inbound -Protocol TCP -LocalPort 8019 -Action Allow

# Program exceptions - adjust the year folder to match the installed release
New-NetFirewallRule -DisplayName "QuickBooks® QBDBMgrN" -Direction Inbound -Program "C:\Program Files\Intuit\QuickBooks® 2024\QBDBMgrN.exe" -Action Allow
New-NetFirewallRule -DisplayName "QuickBooks® QBW32" -Direction Inbound -Program "C:\Program Files\Intuit\QuickBooks® 2024\QBW32.exe" -Action Allow
New-NetFirewallRule -DisplayName "QuickBooks® Monitor Service" -Direction Inbound -Program "C:\Program Files (x86)\Common Files\Intuit\QuickBooks®\QBCFMonitorService.exe" -Action Allow

# Confirm what is actually in place after a Windows feature update
Get-NetFirewallRule -DisplayName "QuickBooks®*" | Select-Object DisplayName, Enabled, Direction, Profile
About the earlier firewall block
The Windows Server Configuration section earlier in this guide contains a New-NetFirewallRule block with a hardcoded port range. Treat those numbers as an illustration of the command's shape, not as the ports your installation uses. The number that matters is the one Port Monitor reports on your host, and it is the one the example above expects you to supply.
Troubleshooting Common Issues
H-Series Errors Resolution
Error H202: Multi-user switch to single user
This error indicates QuickBooks® is trying to establish a connection to the company file but cannot communicate with the server.
Resolution Steps:
- 1.Verify hosting is enabled on server only
File → Utilities. The server should show "Stop Hosting Multi-User Access" (hosting is on). Every workstation should show "Host Multi-User Access" (hosting is off).
- 2.Check Database Server Manager
Rescan company files folder
- 3.Configure Windows Firewall
Add QuickBooks® ports as exceptions
- 4.Verify .ND file exists
Check for CompanyFile.qbw.nd in same folder as company file
Advanced Fix:
ping [ServerName] -tTest network connectivity to server
Error H505: QuickBooks® needs to be set up
This error occurs when QuickBooks® is set up incorrectly or the computer requiring access is unable to reach the server.
Resolution Steps:
- 1.Disable hosting on all workstations
File → Utilities → Stop Hosting Multi-User Access (on all workstations)
- 2.Create new .ND file
Rename existing .ND file and rescan in Database Server Manager
- 3.Check DNS resolution
Use server IP address instead of hostname if DNS issues exist
Performance Optimization
Server Optimization
Hardware Optimization
Software Optimization
Network Optimization
# Optimize network settings for QuickBooks®
Set-NetTCPSetting -SettingName InternetCustom -AutoTuningLevelLocal Disabled
Set-NetOffloadGlobalSetting -Chimney Disabled
Set-NetOffloadGlobalSetting -ReceiveSideScaling Enabled
Set-NetOffloadGlobalSetting -ReceiveSegmentCoalescing Disabled

# Increase IRPStackSize for better network performance
Set-ItemProperty -Path "HKLM:\SYSTEM\CurrentControlSet\Services\LanmanServer\Parameters" -Name "IRPStackSize" -Value 32 -Type DWord

# Disable network throttling
Set-ItemProperty -Path "HKLM:\SOFTWARE\Microsoft\Windows NT\CurrentVersion\Multimedia\SystemProfile" -Name "NetworkThrottlingIndex" -Value 4294967295 -Type DWord
Security Best Practices
A multi-user QuickBooks® host concentrates two things worth protecting: the company file itself, and a Windows machine that a lot of people can reach. The practices below are the ones that repay the effort, and each of them fixes a shortcut that is genuinely common in deployments that otherwise work.
Accounts and Permissions
- 1Give the database service a dedicated log-on account
The database service should log on as a dedicated service account, not as a named person's account. A personal account ties a business-critical service to one employee's password expiry and to their leaving date — the service stops, everyone loses the file, and the cause is nowhere near where anyone will look. A dedicated account also means the service's access rights can be reasoned about on their own.
- 2Grant Modify, not Full Control, on the company folder
Create a named QuickBooks® access group, put the people who need the file in it, and grant that group Modify on the company file folder. Grant the service account the same. Modify covers everything normal work requires; Full Control adds the power to change permissions and take ownership, which nothing in the daily workflow uses. And never grant Everyone full control as a shortcut — it makes the folder readable and rewritable by every account on the machine, including services and any account an attacker lands on. The PowerShell example earlier in this guide grants FullControl for brevity; tighten it to Modify on a real folder.
- 3Remember that share and NTFS permissions are both applied
Windows evaluates the share permission and the NTFS permission and applies the more restrictive of the two. So a folder shared as Read stays read-only across the network no matter how generous the NTFS entries are — which is why a carefully corrected NTFS permission can appear to have changed nothing at all. When a permission fix seems to have no effect, check the share tab before you re-check the security tab.
- 4Keep QuickBooks® users separate from Windows accounts
The QuickBooks® company users created under Company → Set Up Users are their own list, with their own passwords and their own roles. They are not Windows accounts and do not inherit anything from them. Keep the two mapped in your own records but managed separately, and give the QuickBooks® Admin role to as few people as the work allows — that role can change other users, alter closed periods and reach every part of the file.
Exposure and Recovery
Never expose RDP directly to the internet
A session port reachable from the open internet is scanned continuously and attacked by credential stuffing within hours of being opened. Put Remote Desktop behind a VPN or an RD Gateway so that the session port is never published directly, and require multi-factor authentication on whichever of those you choose. Forwarding the port on the router because it is quicker is the single most damaging shortcut on this page.
Keep backups off the host that serves the file
A backup stored on the same machine as the company file shares that machine's fate: one failed disk, one ransomware event, one bad restore, and both copies are gone together. Send backups to separate storage, and confirm periodically that a backup actually restores rather than merely that the job reported success.
Maintenance & Monitoring
Regular Maintenance Tasks
| Task | Frequency | Priority |
|---|---|---|
| Verify & Rebuild Data | Weekly | Critical |
| Backup Company Files | Daily | Critical |
| Update QuickBooks® | Monthly | High |
| Check Database Server Logs | Weekly | High |
| Condense Data | Yearly | Medium |
Monitoring Scripts
# Monitor QuickBooks® services and restart if needed
$services = @("QuickBooksDB24", "QBCFMonitorService")

foreach ($service in $services) {
    $svc = Get-Service -Name $service -ErrorAction SilentlyContinue
    if ($svc.Status -ne 'Running') {
        Write-Host "$service is not running. Starting service..." -ForegroundColor Yellow
        Start-Service -Name $service
        Start-Sleep -Seconds 5

        $svc = Get-Service -Name $service
        if ($svc.Status -eq 'Running') {
            Write-Host "$service started successfully" -ForegroundColor Green
        } else {
            Write-Host "Failed to start $service" -ForegroundColor Red
            # Send alert email or log to event viewer
        }
    } else {
        Write-Host "$service is running" -ForegroundColor Green
    }
}
Conclusion
A dependable RDS deployment needs supported QuickBooks® and Windows releases, one controlled company-file location, correctly scoped services and permissions, and repeatable tests from user sessions. Record the final configuration and recheck it after updates or infrastructure changes.
Key Takeaways
Need Professional Implementation?
For complex deployments or enterprise implementations requiring expert assistance, Prime Connect provides professional QuickBooks® consulting services.
Contact Prime Connect for Professional Services