Export or back up the relevant data first. Do not delete, void, unreconcile, or adjust historical transactions unless you understand the accounting impact.
Menu names can change. We link current first-party instructions so you can confirm product behavior before acting.
Quick answer
A QuickBooks Online business should invite its accountant or accounting firm through the dedicated accountant-access area under user management. Intuit currently states that accountant users invited through this workflow do not count toward the ordinary subscription user limit. Use the firm email or user ID supplied through a trusted channel; never share the primary administrator password.
QuickBooks Online Accountant is the firm-side workspace. After the client invitation is accepted, the accounting-firm administrator controls which firm team members can access that client. The client should still review the active firm relationship and remove access when the engagement ends.
Workflow map
Invite → assign → review → offboard
Accountant access is a lifecycle. Treat the firm invitation, firm-side team access, periodic review, and removal as separate control points.
- 1
Invite firm
Use the client company’s accountant invitation path and the verified firm email.
Evidence: Correct company and invitation recipient.
- 2
Assign team
The accounting firm controls which authorised firm members can work in the client.
Evidence: Named people and minimum permissions.
- 3
Review
Inspect active users, unusual access, role changes, and the continuing business need.
Evidence: Quarterly access attestation.
- 4
Offboard
Remove firm or team access, transfer ownership of automations, and retain handoff evidence.
Evidence: No orphaned credentials or connected apps.
Separate the client-company side from the accounting-firm side
Business company
The primary or company administrator invites the accounting firm, reviews status, and removes the firm when access is no longer required.
Accounting firm
A firm administrator accepts the client relationship and assigns client access to named team members using firm roles.
Individual user
The person signs in with an individual Intuit identity. Credentials and multifactor authentication must not be shared.
A client invitation is not the same as adding every accountant as an ordinary company user. It is also not the same as enrolling in certification, finding a ProAdvisor, subscribing to a product, or signing in to an existing accountant account.
Invite an accountant or accounting firm safely
- Establish who you are inviting. Confirm the legal firm name, engagement owner, email or firm user ID, work scope, start date, and approving company administrator.
- Sign in with the right role. Sign in as a primary or company administrator.
- Open the accountant area. Open Settings → Manage users, then the Accountants or Accounting Firms area shown in the current interface.
- Send the invitation. Enter the verified firm email address or user ID and send the invitation.
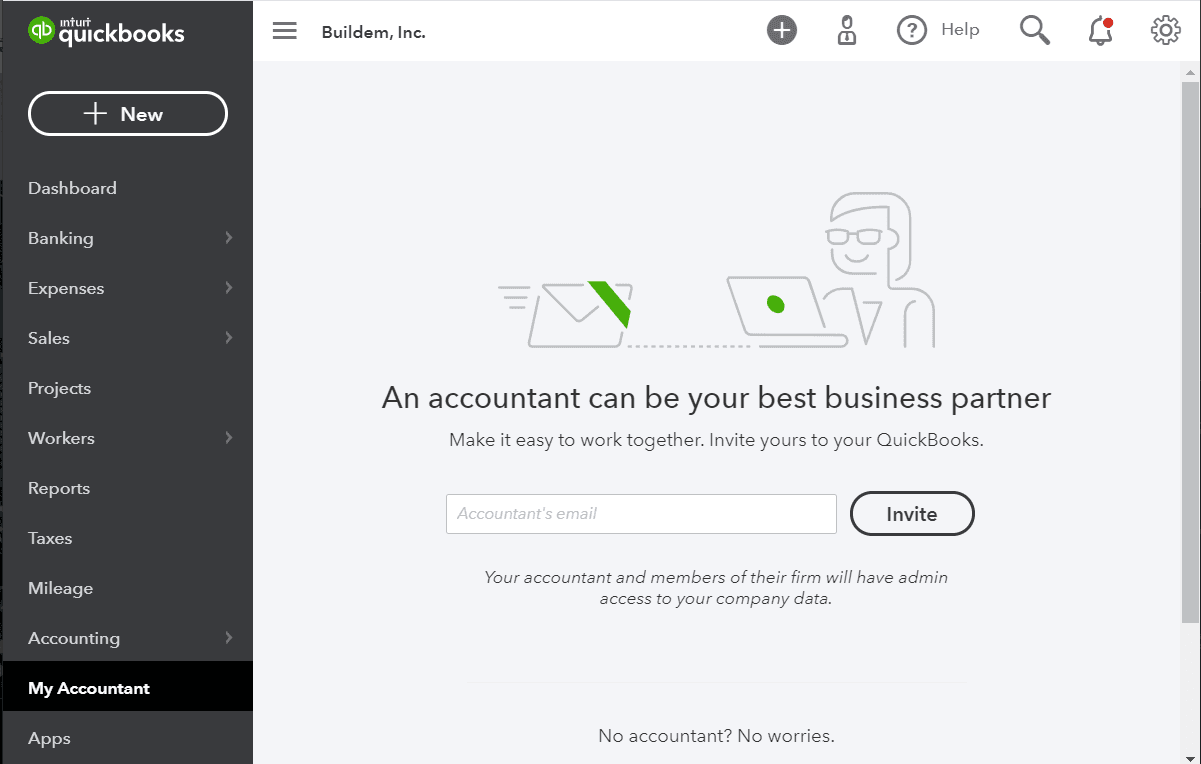
- 1My Accountant is the dedicated route. Inviting a firm as an ordinary user through Manage users grants a different access level, so use this workflow rather than adding the address to the user list.
- 2Enter the address you verified in the earlier steps, not one taken from an email signature or a phone call you did not initiate. This single field is where a mistyped or personal address becomes standing access.
- 3Invite sends immediately; there is no confirmation step between this button and the email. Record the date, inviter, recipient, and purpose before you press it.
- 4The screen states the consequence: the accountant and members of their firm get admin access to the company data. That is the whole ledger, so treat this as an authorisation decision rather than a convenience.
- Log it in the access register. Record the date, inviter, recipient, company, purpose, and invitation status in the access register.
- Confirm out of band. Ask the firm to confirm acceptance through a separate trusted channel.
- Check the resulting access. Verify that the status changes from invited to active and that the intended firm—not a mistyped or personal address—has access.
Treat an unexpected request to invite a support address, change the primary admin, or share a verification code as a security event. Confirm the request through the official support or firm contact information already on record.
Control firm-team access inside QuickBooks Online Accountant
Intuit documents firm access and client access as separate permission areas. A firm administrator can add team members, select a default or custom firm role, and assign a client role for each client the person needs to serve.
- Grant only the firm features and client companies required for the job.
- Keep payroll, payments, banking, sales, expense, inventory, tax, and administrator access limited to assigned responsibilities.
- Do not grant every staff member access to every client by default.
- Review client assignments after staffing changes, leaves, role changes, mergers, and engagement termination.
- Use named accounts so the audit trail identifies the person who acted.
Match permissions to the engagement and data sensitivity
Before granting access, list the work the accountant must perform:
- View-only reporting or management review.
- Transaction coding and bank-feed review.
- Reconciliation and month-end adjustments.
- Accounts receivable, accounts payable, payroll, sales tax, or inventory support.
- Close-date changes, journal entries, reclassification, cleanup, or tax preparation.
- App connections, bank access, payments, or administrator functions.
The accountant role can include powerful review and correction tools. Preserve engagement approval, require source support for material adjustments, review the audit log, and use close controls. Payroll and identity data require additional confidentiality and access safeguards.
Troubleshoot an invitation without sending duplicates
- Confirm the exact company and active Intuit identity used by the firm.
- Review whether the invitation is pending, accepted, expired, or sent to the wrong address.
- Check spam and security filtering for the intended recipient.
- Confirm that the inviter is a primary or company administrator.
- Check whether the recipient is attempting to accept with a different Intuit user ID.
- Cancel or remove an incorrect pending invitation before sending a corrected one.
- If the product shows a user-limit message, verify that the accountant workflow—not an ordinary user role—was used.
Do not create several near-identical user identities as a workaround. That fragments audit history and makes later offboarding unreliable.
Change or remove access when the relationship changes
- Confirm the effective termination date and whether final reports, workpapers, exports, or adjustments remain outstanding.
- Preserve the audit log and approved final close evidence.
- Remove the old accounting-firm relationship from every applicable QuickBooks company.
- Remove or deactivate ordinary users, app connections, bank permissions, shared folders, and external portals separately.
- Change primary administrator or recovery contacts only through an approved succession process.
- Review recurring transactions, bank rules, closing settings, accountant-created apps, and pending invitations.
- Record completion in the access register and have an administrator verify it.
QuickBooks accountant-access checklist
- The firm identity, engagement, scope, approver, and start date are documented.
- The invitation uses the dedicated accountant workflow and a verified firm address or user ID.
- No administrator credentials or verification codes are shared.
- Firm staff receive only the firm and client permissions needed for their roles.
- Pending and active access is reviewed after the invitation.
- Material adjustments retain evidence and approval.
- Payroll, identity, bank, and payment data receive appropriate safeguards.
- Every company has a periodic user, accountant, and connected-app review.
- Offboarding removes the firm, ordinary users, apps, and external access separately.
Sources checked
First-party product documentation used to verify the workflow and risk notes in this guide.
- Add and manage users in QuickBooks OnlineIntuit QuickBooks Support · Checked August 11, 2026
- How to give your accountant access to your QuickBooksIntuit QuickBooks Support · Checked August 11, 2026
- Add and manage your accounting team in QuickBooks Online AccountantIntuit QuickBooks Support · Checked August 11, 2026